Wednesday, 29 March 2017

Force Push


This was made in adobe after effects using motion tracking and a mix of effects such as Bulge to make the hands grow a bit during the push adding a nice effect. I used a pre made shock wave effect for the main effect but i have some things in the background such as a feathered layer mask which is used for tracking.

I did this in front of a green-screen which i used keylight 2.1 to remove the green screen and replace it witha background from skyrim as it fitted the effect.

Thursday, 23 March 2017

Planning the Scene 23/03/17


For the first part of the Industry standard model project we had to come to a decision of a theme to use after some discussion we decided upon doing a steampunk Submarine with us building the insides and the landscape around it. We are taking Inspiration from crash Banicoot and Rachet and Clank for the style of the models.

I'll be Making the control panel of the submarine with big button and leavers with plenty of exposed cogs to give it a nice steam Punk feel.


Dog Catcher Game Stage 4 Rotation of objects 23/3/17


This script i added makes the dog rotate and face a specific vector this is done inside my player movement script the director the player is moving in will make the sprite rotate to face  the direction. I'll be adding the script to the enemy as well as the player.

An issue i had when writing the script was the messed up with the brackets and did not put one where i had to this made it so the new rotation script only worked if i was moving downwards as i never had an bracket between the new code and the last "If" statement.


Wednesday, 22 March 2017

Planning for Solo VFX Project 22/03/17


This is the basic plan for my Solo VFX project it will be a laser shoot out which will end up in a fire ball once one of the lasers hits an fuel tank which causes a big explosion taking up the screen. I'll likely be making some additions to make it longer as in its current stage it feels shorter that it should be.

Plasticine Head modeling 22/03/17

We modeled some Plasticine heads. I started with the eyes to build the shape of the head and worked downwards from it. The nose came out the best of the different parts. I was unable to get the eyes to look how i wanted as the shape and depth were a struggle when using Plasticine. When completed i gave him a straw hat to complete the unintentional farmer look the model had.

Text Crumpling In After effects 22/03/17


We returned to using the pin tool in adobe after effects to set key frames and move the text to the correct position to give it the effect of being crushed by the bolder. When applying the pins i use starch tool to make it move separately to other parts. I went through and applied it to each letter. Next I will be making my own version to use with my own text and item.

Thursday, 16 March 2017

Normal Map Research

A Normal Map allows you to add depth to your texture this means you can add more detail while allowing a lower poly count this is useful for low poly models to still be able to have detail. The Detail is Created Through the use of shading and light to create the illusion of the higher detail.
The Bump map is an older version which uses RGB and gray scale values by using this Bump maps are easy to modify in Photoshop as well.


I have been Doing Normal mapping with Some Unforune results I have attempted to get something and i have basic Normal map with some depth intentional ir look like some sci-fi box with wires all over the place

I 'm going to have another go at making the box and make it more simplifed as then mesh is causing problems with the baking.


Unity Game Dog Catcher Stage 2

This shows the Dog Catchers which now have way points giving them movement once you hit one of the Catchers it will bring up the start gave menu this is done through the Unity UI script.


Wednesday, 15 March 2017

VFX Skin Replacements


We have used adobe after effects to change the skin of a person to add effects to them to do this we started by tracking in mocha and marking the area i feathed it to make it more smooth. I added the veins with with a solid, i inverted it. To finish off i added a color correction and made it more evil power like. This is useful as it can be reused for a range off effects.

Thursday, 9 March 2017

09/03/17 Low Poly Renders


This is the final renders of the low poly wacky races task the first image is my Ice Cream truck with the wire frame which was the main model i made its only using 300 tries out of 1000. The render has both a wire frame and a standard image the pig has a use background to show off the background, The Previous ones were done before i could set up the use background. The Main image Contains all of my models and the rest of my group with the environment.

My Ice Cream Truck is one of my favorite models as its simple and the use of soft selected for the cone. Even with the various issue i had with it. Over all we have worked well as a team with good contributions on all sides.

Dog Catcher Unity Game Stage 1

i

These are the assets i am using for my dog catcher game all assets all made on Photoshop in order tree, dog, Dog catcher and the wall . The Wall is based off the one used for a different unity game but has been drastically improved. I need to Make a Projectile next which i might use a tennis ball for. . I Have a basic level design done and the movement code .


Tuesday, 7 March 2017

Blood Splatter

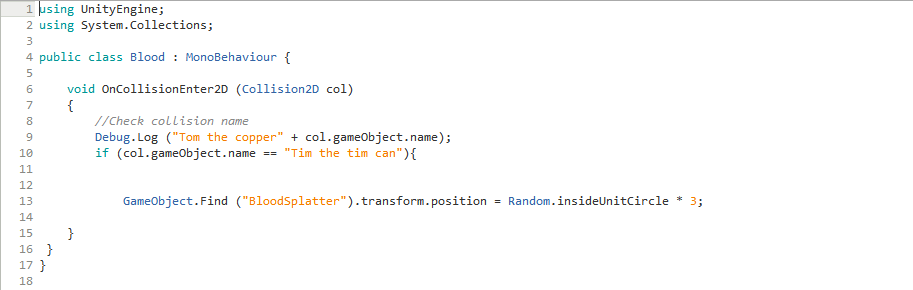
I have learned to do a basic blood splatter for use when you get hit this can be reused and tinkered with to add different effects. To Make this work i used  "Random.InsideUnitCircle"  which will place an object with the axis of the area. I have the center of the circle set to the origin 0 but this is changeable. The Blood is hidden off the screen and Its gets moved via "GameObject.Find" and put in a random location.

GameObjectF.Find ("Ball").transform.position = Random.InsideUnitCircle * 3;


Thursday, 2 March 2017

2/03/2017 Low Poly Task Update


For the Low poly group task we have a large amount of assets all textured and spread around the environment today i made a jet-ski to fill the water as it was lacking so we also added other water based items. I also got the Ice cream truck fixed as it had  shading issue to fix it i had to change it from soft edges to harden edges this fixed the shading issue i also used target weld to fix a few issue where they were gaps.


Overall the task is coming along well with a large variation of models and will likely be ready to be presented